Showing posts with label subdivision. Show all posts

Monday, 24 October 2016

Future City: Update 8 - A Mixed Bag

I haven't managed to write anything this last week (or two) due to other things going on in my life (shock!), and not really feeling like I've been focused on one particular thing.  Instead of a themed post let's just have a look through what's been going on.

Refinement Fixes

Spent some time tidying up the city a bit.  There are a few places where detail refinement was being blocked so I investigated those.
  • Empty Stacker recursion procedure leaf nodes were not ignored.
Stacker Merge appears as leaf when no further content needed, but should be ignored as not a geometry producer itself.
(excuse low-res image, Cairo scaled it down because the GraphViz output was too large)
  • Temporary general triangle fill added for rooftops didn't support refinement.
Roof triangle refinement - before and after
  • Bolts had bounds that were too large, needed to be pre-shrunk.
Bolt bounds blocking refinement - additional re-size in procedure to fix
  • Mesh primitive operators were not being counted as geometry producing (which broke the fix for the Stacker recursion issue above).
Post load checks to classify operators by whether they modify/produce geometry or not.
  • Unnecessary deep refinement of surfaces meant a deluge of synthesis when you strayed very close to a surface. This was slowing things down a little so I added a limit check in the sub-division process.
Adding a refinement limit test, whilst also abstracting out the recursion check to make it more re-usable.
To help track down some of these I added a bit more error diagnostics information:
  • Capture errors show in view panel for selected node
  • Error filter slider for when too many to display at once
  • Any bounds information in the error messages is visualised in red
Additional error diagnostics - better messages, error select, and bounds rendering

More Girders

Couldn't resist more girder improvements as this has become a bit of an 'extreme detail' test case.
  • Washers under nuts
  • Proper facets on bolts
  • Threads on the bolts (hacky, but fine for now)
Washers, faceted nuts, and threads.
  • Added cross bracing to girders
  • Fillet pieces for cross bracing
Cross-bracing and attachment fillets
  • Added rolling fillets to I-beam section
  • Added welds to fillets and fixing plates
Welds and I-beam section forming fillets
All a bit excessive, but some good tests of the detail management refinement systems.  Several issues and bugs were surfaced from this work.

The Wilderness

To make the city more interesting, and provide more of a 'setting' for it I decided to surround it with a Rural district type.  Currently just green/grass, this breaks up the city tone and gives it a rounder appearance.
Rural district type now surrounds the city.
This will provide something to have as the backdrop, or vista, when height support is added and we can have hills and mountains in the background.
This was implemented by re-purposing the commercial district type and giving it a negative gradient along it's radius instead of a positive one like the central districts.  I also parameterised the location, sizes and weights of the district types so we get much greater city layout variance as we vary the city seed values.
Some parameterised city examples

Demo Planning

I'm aiming to have my first-pass city demo-able by the end of the year, and so far I feel like I'm on track for that.  I thought I'd better make a clearer plan though so I spent a morning breaking down the things I have left to do and thinking about the timings.  Here's the to-do list:
  • Finish filling out the placeholder zones (1) - I really need to fill in the residential and leisure areas as they will lend a 'more human' aspect to the city (business and industrial so far).  I'm postponing commercial and spaceport as there are more important things to focus on.
  • Implement first-pass landscape support (1) - A big thing this city doesn't have yet is elevation.  It was always something I wanted to do to add richness and interest to the city.  So we need support for a height function (of some sort), blending (to interface with flat parts), and placing of blocks on landscape (giving them the appropriate elevation).
  • Height integration (1) - Once supported, the natural areas (leisure, surround, and business in-fill) and the interfaces between adjacent elevations need content to provide pleasant and realistic transitions.  This will need to take into account block boundaries, height, and importantly; access ways (or lack thereof) between blocks.
  • Detail pass (2) - Another pass is needed to add more detail to the low-level city, that you will see when 'walking around' at street-level. This includes features like doors, windows, pavement, as well as assets such as bins, streetlights, benches, planters, and maybe trees.
  • Navigation/viewing (1) - To demo this city properly I need people to be able to control the camera in the standalone player.  This would start with basic is keyboard/mouse (FPS) support, with controller support coming later, and then maybe an attract-mode camera mode if there is time.  This would be quite involved as it will need to 'explore' the city to find good camera positions and paths (for some definition of 'good').
  • Lighting (4) - I'd really like to try out my lighting ideas, they should really bring the city alive.  This would also include some fogging/haze/sky work, and maybe some simple clouds for fun.
  • Bonus: Transparency and reflection - If I get time or want a break for something more adventurous I'll try and get some transparency and reflection support in to allow water and glass effects to be added.
Timings (in brackets) are estimated weeks.  We'll see how it goes as I am already a little behind and am still due to have some time off.

Next

I need to get the residential parts populated as soon as I can, so I'll be looking at more 'house-like' buildings and how to create them.

Sunday, 18 September 2016

Future City: Update 5 - The Fencepost Problem

Fence-posts

A lot of structures have a regularity to them that is useful to emulate, whether it be fences, walls, windows, rows of houses, tree, or chimney pots.  As with the fence-post problem you can't implement them as a straight repeat of a single object though since you need one more post than fence panels.
The Fence-post Problem: N panels but N+1 posts.
Before we look at solving this however, we will start simpler; looking at how we can handle instancing of the more-straightforward repeating structures.
Example of a simple array of objects.

Recursion

Apparance doesn't yet support arrays as a data-type, arraying of objects, or any form of looping, but an effective alternative that is supported well is recursion.  Here we can break down a repeating problem into successive; sub-division, geometry instantiation, and recursion, until the space is filled.
Basic recursion used for repeating geometry.
The process of split+generate is invoked on the left split area each time until there is no more to split.
The process of sub-division can be improved somewhat in a couple of ways; first, instead of creating a chain of recursions, one-deeper-per-instance, we can tackle it with successive sub-division and two recursion paths instead.  This reduces the stack depth needed from N to log2 N (or thereabouts).
Improved recursion used for repeating geometry.
Recursion is applied to both parts of a central split until there is no more to split.
The other thing we can do is to wrap up the splitting calculations into helper procedures that make it easier to implement these arrays of objects.  The general problem here is that we need to be able to have our own geometry within the recursion process which is tricky to support.  Instead of having to support embedding of procedures (akin to passing function pointers in code) however, we can provide two procedures, with which we 'book-end' our own geometry generation.  These handle the Splitting Logic, and the Combining Logic needed to implement the array process. The general form for this is:
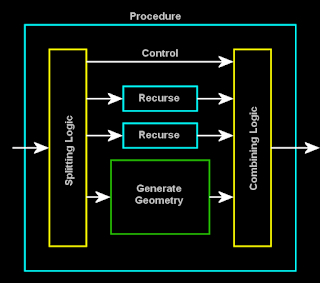
Layout of a procedure for arraying geometry using the two helper procedures to wrap the recursion and geometry instantiation.
NOTES: Any external parameters the procedure needs (to customise the generation have to be passed down to the recursion calls too.  The Control channel is used to select which of the three outputs are to be combined before returning to the outer procedure, this could be a pair of recursions, or some generated geometry.  A further improvement to this process might be to use all three at once when an odd number of elements are present since we can make the splitting even by immediately instantiating geometry for the centre region.s
Potential further improvement to recursion efficiency.

The Divider

These helper procedures I've named 'The Divider' as it divides up space in one direction into equal size pieces for our procedure to build geometry into.
Basic recursion helper procedure: The Divider (splitting part)
This is used in conjunction with a 'Merger' which handles aggregation of the elements.
Basic recursion helper procedure: The Divider (merge part)
This is a really useful tool to building and distributing content around the world.  For example, when a long thin strip of land is encountered in the business district, multiple buildings are placed in a row instead of a single long thin building.  Here we see the Divider and Merge stages in use in the Business Block procedure that handles this:
Divider approach used to create rows of buildings in the business district.
And here it is in action as the space available changes.
Array of buildings filling a narrow strip of land using the recursive Divider approach.

The Stacker

To tackle the fence-post problem, and some of the more sophisticated use-cases, a significantly more powerful version of the divider approach is needed.  Here are a couple of examples:
This piece of railing can be sectioned up in a couple of ways, either as the classic fence-post arrangement (circular design 'panels' between flower 'posts'), or by treating the flowers a separators between the circular parts and two end pieces connecting to the walls.
These railings can be divided up in a couple of ways.
This building facade can similarly be broken up in to ways, but these are a bit more involved:
This building facade can be divided up in a couple of ways.
Here, however we divide it up we have two end-caps (the corners of the building), but the way the wall/windows are divided up can be approached in two ways:
  1. The window sections are wider and include a bit of wall.
  2. The wall sections are much cleaner and are present between the end caps and the windows as well as between pairs of window sections.
These requirements can be generalised into the following (optional) sections with what I'm calling 'The Stacker':
  1. Start cap
  2. Multiple repetitions of:
    1. Spacer
    2. Object
  3. Spacer
  4. End cap
This can be constructed in a similar fashion to the Divider, but with more user supplied elements in between the helper procedures.  This happened to turn out to be the most complicated procedure I'd ever built!  I actually tried to tackle this problem a while ago, but decided that it would be impossible without the grouping and notation feature so I set about adding that instead.  I'm glad I did now as notes are used extensively to partition the logic and document the processing involved:
The most complex procedure I've created: 'The Stacker' (splitting part)
This isn't the most efficient implementation, nor the simplest, I'm sure.  But it works, and can be revisited later if it needs speeding up or reducing in size.  I could even be re-implemented in code as a build-in operator if needed.
As with the Divider, there is a corresponding re-combination procedure seen here:
Much simpler companion to The Stacker; the merge part.
As this was a very complicated procedure, and with many combinations of inputs and options it was imperative to have good test cases.  Here we see a large set of instances for most of the various configurations it supports.
Test cases for The Stacker.  Many combinations of the various configurations are tested in one place for easy visual inspection.

Examples

Now we have this powerful tool at our disposal I had a chance to explore what can be done with it.

Wall

A straightforward test case is a wall with regular support pillars and larger end columns.
The Stacker used to implement a wall with regular support and end detail.
Wrapping the different wall elements in a Stacker and corresponding combiner gives us this procedure:
Interesting brick wall structure implemented with the Stacker recursion helper procedures.
Which produces this satisfactory construction.
Wall design constant parameterisation.
Brick Wall procedure expanding to use the space available.

Steel Truss

One of the real test cases I wanted to try out was to build steel-work structures out of girders that can be used as support structures around many industrial components.
Steel structures of the kind I'd like to use in the industrial district of Future City.
More specifically, I want to re-create this configuration:
Example of steel beam configuration I want to produce.
This is made from steel I-Beam sections and has two stacking aspects to it, horizontally we have:
  1. (optional) End upright
  2. Set of cross-members
    1. separated by uprights
  3. (optional) End upright
Vertically the cross-members are stacked thus:
  1. Cross-members
    1. Separated by gaps
This was implemented with a pair of nested procedures, one for horizontal, one for vertical, all contained within a main entry-point procedure.
Nested horizontal and vertical stacking procedures to create steel-work side wall.
Here is a selection of constructs built using this set of procedures:
Random structure variation based around truss, tower, and side procedures.
Steel constructs based around a steel-work side section.
Truss or gantry built from girders.
Close of up construction detail.  As you get closer, the bolts are revealed.

Next

Next I should be able to start building some more interesting structures for the industrial district using all these new-found constructional powers.

Monday, 12 September 2016

Future City: Update 4 - Down To Business

This week I've been developing the business district layout a bit, dealing with a few bugs, experimenting with gradients, optimising the rendering, and adding a few features and fixes to help diagnose problems.  Oh, and it was my birthday too :)

Business

The business district is going to be lots of tall, close-packed skyscrapers with occasional open spaces amongst them.  With the area we are covering there are going to be a lot of buildings, and a lot of geometry.  To deal with this we have to introduce the buildings (and gradually higher detailed versions of them) progressively as we get closer.  Since a 'Manhattan skyline' area of a city tends to be visible from a long way off we are going to have to introduce buildings from quite a distance away.  We can do this gradually, and as long as there are some of the tallest ones appearing early on we should get a good impression of a distant city.
Distant 'Manhattan skyline' effect from larger buildings
At the moment we will just use a simple boxy model for the buildings, which should suffice for distant buildings, but will need to be replaced for the closer ones.  The detail testing/switching logic for the skyscraper uses the building height to judge which detail band they should go in.  I set it up to introduce the tallest ones in a large/distant range, the mid-height ones in the next one and the smallest ones in the closer range.  The small ones can be left until quite close before we even fade them in.  Once the viewpoint is within the city, most of what you should be able to see has been faded in.
Inner city, all building proxies faded in.
Most business district blocks are of a size suitable to house a single building.  If they are a bit long or large still we sub-divide a little more and instantiate a couple of similar buildings.
At the moment we will ignore the connectivity and access situation at the periphery of each block that we saw set up in previous posts.  It's not that we aren't going to use this information eventually, but barriers and division are probably not a big features in a business area.  To postpone this for now I added a periphery clearance space around the edge of each block.  This can be later be filled with open-space furniture (benches, water features, trees, etc).  These will carry the open space blocks in the city in amongst the buildings too.
Clearance around buildings connects with open areas.

Detail Comparison

It proved quite tricky to get my head around how to get the building reveal/distance calculations to work in such a way that it was clear what the effects of the control parameters were.  Sometimes it's very easy to set something up like this and then just 'give up' by randomly fiddling with values until it seems to be working well enough.  The first attempt was like this; the values were too arbitrary and I wasn't sure what effect they were actually having.  By stepping back, thinking about the problem in a slightly different way I ended up with a system that works.  The problem was that we have two values with different meanings to compare; the height of the building and the size of the block they are being instantiated into.  Instead of trying to massage one into the 'space' of the other it is easier to convert both into an intermediate, neutral range.  Turning both into a normalised 0 to 1 range and then comparing them seems easier to calculate and balance.
When should we introduce a distance building?
Since the block size are powers of two, it also seemed a good idea to changing them to a linear value for the purposes of comparison too.  This produced the following stages of building reveal.
Stages of distance skyscraper population, far to near.

Gradient Surfaces

Using a simple box for each building quickly blocked refinement as a geometry from a normal box primitive can't be sub-divided automatically.  This has been fixed before by using the generic rectangular patch procedure (see previous post) which sub-divides and adds some interesting extra surface detail.  Since this is a bit 'blocky' I decided to try to implement a smoother version.
Block vs. Smooth surface patch procedure
Until now, all modelling primitives have only supported painting in a single flat colour (all models use vertex colour to drive their diffuse appearance), so to introduce smoother, gradient based surfaces we need another primitive or paint operator.  I decided that a flat rectangular sheet primitive with corner colour inputs would serve best to keep the amount of pre-processing and complex painting around it in the procedure to a minimum.
Coloured Sheet primitive for creating smooth gradient surfaces
Similar to the generic patch, we will be introducing variations in the colouring as the sub-division happens to add detail.  This time however, it's a bit more complicated as the adjacent pieces need to share colours along their boundaries.  Also, we aren't going to vary a single colour, we are going to blend between two main colours as this helps keep the colours consistent as we divide deeper.  By carrying both a blend factor and a seed value with each corner vertex down through the sub-division process we can ensure that as each edge is divided up and perturbed by the same amount from each side.  We end up with a variation on the mid-point noise algorithm and build up a nice surface detail as we get close.
Increasing sub-divisions of smooth patch procedure (high contrast detail setting)
This provides us with a couple of nice features when applied to the buildings:
  • More interesting surfaces (not just flat).
  • Fewer edges visible, less blocky
  • Even the lowest detail buildings have gentle gradients across them.
Smooth patch applied to low-detail skyscrapers in business district.

Summary

This gives us low-ish detail city buildings, which we will re-visit in the future to fully detail and flesh out.  For now though we are going to look at other district types and get them up to a similar level of detail.
This example demonstrates a couple of significant advantage of the procedural approach to modelling:
  1. Re-visiting models to add detail later is a normal part of the process.
  2. Upgrading fundamental elements used across your environment will automatically be applied everywhere it is used.
  3. Building up your scene breadth first instead of having to work depth first means your scene builds up as a whole, and not piece by piece.
  4. You get a working environment sooner, game-play and other disciplines can get to work earlier while the detail is added in parallel.
We shall see these points come up again and again.  They are some of the reasons I like this approach to content creation.

Next

I might do a side-post on the debugging and diagnosis issues I've had this week, but then it's on to the industrial zone!  ..which sounds like something from the Crystal Maze :D

P.S. Cake

Since it was my birthday I thought I'd build some procedural cakes to celebrate.  I'm quite pleased with the result of a day of 'baking'.
Procedural cakes to celebrate.

Monday, 5 September 2016

Future City: Update 3 - Blocks & Detail

Blocking Out

After digging down through the zones and district types, we have some large city regions set out.  We now want to break them down into city blocks so that we can start looking at where buildings will go.
The process is similar to the zone sub-division and uses most of the same process and procedures, but this time the design constants are dependent on the district type.  For example: residential and leisure areas are probably in smaller blocks than industrial and space-port blocks, with business somewhere in the middle.  We can experiment with other differences later on, say, favouring longer thinner leisure areas for parks or squarer business areas suitable for skyscrapers.
Block design constants, parameterised by district type

Whitebox

For testing purposes I added a simple cuboid as a placeholder building to each block.
Simple white-box building added to each block for test purposes
This is just a proportion of block size for now, with the height chosen randomly.  In reality a block may eventually have multiple buildings, but for now I just wanted to get a feel for how the city would look and investigate the detail levels at different distances.
View across 'white-box city'

Detail

Apparance is built around the premise of bands of detail extending out from the viewpoint, each higher detail one built based on re-synthesising the lower detail procedures.  As we start to build more detail into the city we need to begin setting up the integration with the detail management in the engine.  Since each re-synthesis is performed using sub-procedures with exactly the same input parameters, something else must provide the ability to change their behaviour as different detail results are required.
Re-synthesis of procedures for successive depths in the detail hierarchy.  How do they know what detail level to generate?
As the scene is progressively refined to give more detail, the blocks the world is divided up into get smaller.  It is this that a procedure can check to decide what level of detail to generate itself at.
For our city blocks we will switch between an extremely low detail (flat) rendition for far in the distance, to our normal block procedure as their size decreases.  This will have the effect of gradually populating the area with more buildings as we get closer.
Switching out the blocks in the distance for a simpler representation.
The normal blocks intercepted and replaced depending on our detail hierarchy block size.
The Distant Content procedure we are using will make use of a common modelling primitive; a rectangular patch with automatic detail improvement.  This also uses this detail switching to break down and subdivide its surface into smaller pieces to add detail and reveal intricacy as you view mode closely.  Here we see an example of it increasing in detail.
Successive refinements of a generic rectangular patch, introducing more detail and some variation.
Putting this all together and we get a rather satisfying reveal of detail as we move across the city.
Detail transitions and reveal testing across white-box city

Diagnostics

Setting up the detail management in a scene is quite tricky at the moment.  I am still exploring how it can best work and what can be done to improve the user experience.  To help understand what the engine and your procedures are doing a lot of diagnostics displays options are available.
Various diagnostics settings and statistics for a view-port and scene rendering.
These have been added gradually during the development of the engine and this week I've had to revisit them and add a few features to help fix problems with the detail tracking and blending system.  These features are going to be essential in debugging procedures and understanding what the engine is doing with them so it's worth having a look at them now.

Display Modes

There are several colourising modes to visualise various mesh rendering information.
Colourising of meshes to visualise state and show information spatially
The scene node hierarchy can be visualised; a progression of hues used to colour each depth level.
Visualisation of the scene node hierarchy, coloured by depth
The detail range bands and various transition boundaries can be shown to check where the blends are supposed to be happening.
Visualisation of the detail tier ranges, coloured by depth

Focusing

Most of these displays, as well as models and meshes can be selectively singled out using sliders to help close in on specific issues in the scene.  For example, information about, a particular model, in a particular node, in a particular tier of the scene hierarchy can be viewed:
Focusing in on a specific model in the hierarchy
Looking at the node diagnostics panel, we see that this model can't be refined any further because the procedures don't have any sub-procedures small enough to fit in the next scene node size down.
This model in this node can't be subdivided, so no more detail can be generated in this area.
For more information about the procedures in question and how the analysis for resynthesis worked out we can trigger a re-synthesis and analysis of a model which also allows us to see the evaluation tree (via an external GraphViz step).
Here we see the refinement capture analysis failing at our temporary content procedure.
Here it is clear that all the leaf procedures are un-refinable and need more work (which we knew as this is a test procedure of limited ability).

Debug Camera

Using the debug camera and some of these diagnostics overlays we can see the detail reveal effect 'from the outside'.  Here the details is added and revealed around the view-port after a scene reset.  As progressively more detailed versions of the scene are synthesised we can see the extent of each expanding.
Detail regeneration and reveal after scene reset as seen from external debug camera position.

Next

These recent posts have been fairly dry and focusing on dividing up spaces rather than the more interesting process of filling them with things.  We will start seeing some more exciting things soon, I promise :)