Being a visual tool
where all content is created within the editor it is of paramount importance
that the authoring process is a smooth one.
The tools and UI are being developed to be a low friction and intuitive
experience, and I am always thinking about ways to improve them. Let's take a look at the procedure authoring process.
Managing Procedures
The first step is to
add a new procedure to the procedure browser.
Pressing Alt+N creates one called "new procedure". It will inherit the category of the currently
selected procedure. Single click to
select a procedure (highlighted in yellow) and you will see its properties
appear in the property panel. Here you
can change its name from the default to something
suitable. If you want, you can change
its category too. As you rename or
re-categorise a procedure it will move to the appropriate place in the procedure
browser. Scroll around or use the filter
box at the top of the panel to find it.
 |
| Creating a new procedure |
Procedure Files
A procedure is
stored as XML data in a .proc file on disk, along-side this lives a .procedit
file containing any data that is only needed in the editor such as visual graph layout and element descriptions.
 |
| Procedure files and their editor data companions |
Each category has its own folder on disk. As you rename/recategorise a procedure, these
files are renamed and moved around accordingly.
Viewing & Editing
When you are working
on a procedure you will probably want to see the results in the 3D view, to
make a procedure the subject of this view select it and press the View button
at the top of the browser panel.
To edit the
procedure content, either select it and click the Edit button or just
double-click on it and it will open in the procedure graph which we will look
at next.
 |
| Editing and Viewing a new procedure |
Procedure graph
The main part of the
editing window is dedicated to viewing and editing the procedure graph. A procedure has a perimeter surrounding it's
content as well as hosting the input and output connections for it. The procedures title appears at the top of
this area, inputs on the left, and outputs on the right.
The viewing area can
be panned around by holding the right mouse button and dragging, and zoomed in
and out using the mouse wheel. Normally
the view is fully zoomed in and you will only need to zoom as you work on larger
procedures.
Operator Instances
The most important
part of creating a procedure is the adding of operator instances into it. This is done by dragging an operator from the
procedure or operator browser panel onto the procedure.
 |
| Placing operators by dragging onto procedure |
New instances are unconnected and have
default values for all of their inputs.
Operators can be removed by selecting them and pressing Delete.
Selection & Manipulation
Operators (and procedures) placed in your procedure can be singly or multiply selected to allow movement, and input value editing. Shift+Click to add to the selection, and Control+Click to toggle inclusion. You can also drag a marquee (from an empty part of the window) around operators to select them. Click on the empty background to deselect.
Selected procedures can be dragged around to be repositioned, both individually and in multiselected groups. If you move operators near to the edge of the procedure the boundary will be expanded to accommodate it.
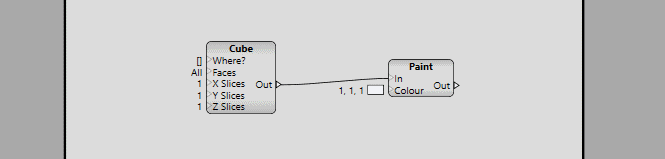
Wiring
To use an operator
it needs to be connected up with the visual wiring metaphor we use to show
where inputs should get their values from.
Each input and output has a name label and a connection point. Hovering over a connection point and dragging
creates a wire attached to that point.
You can now interactively choose the appropriate connection point you
want to connect to. Compatible
connection points (same type) are highlighted during this process. Hover over the target connection point and
release the mouse button to make the connection.
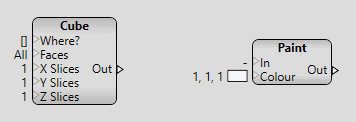 |
| Connecting operators together |
Existing wires can
be moved around easily by grabbing one end and dragging it to somewhere
else. As you hover over a wire it will highlight,
both the whole wire (thicker) and one of the ends (white). This helps you see what a wire is used for in
a complex procedure, as well as allowing you to specify an end to be
reconnected. If you drag a wire and drop it away from any connection points the wire will be removed. Any disconnected inputs will revert to their previously set constant value.
 |
| Highlighting and disconnecting wires |
Constants
Operator instances
with unconnected inputs assume a constant value. To specify this value simply select the
operator and the property panel will list its inputs and values for editing.
 |
| Editing an operator instances input values |
Connected inputs can't have their value set
as they implicitly get their value from another output which is evaluated at
synthesis time.
Procedure IO
Procedure inputs
(along the left edge) and outputs (along the right edge) are created by
starting a new wire on an operator output or input and dragging it outside the
procedure boundary.
 |
| Creating procedure inputs and outputs |
By default this new
input/output assumes the name and type of the operator connection point you
start from but they can be edited in the property panel by selecting the whole
input or output area.
 |
| Editing procedure inputs |
 |
| Editing procedure outputs |
Procedure inputs and
outputs can also be selected individually for editing, or removal (press
Delete).
Once created,
procedure inputs and outputs remain present and can be
connected/disconnected/reconnected the same way as operator instance inputs and
outputs. In fact; procedure outputs behave exactly like operator instance inputs and procedure inputs behave exactly like operator instance outputs.
Notes
To help document
procedures, visual notes can be added.
These are rectangular panels with a title and description text you can
adorn a procedure with to explain what is going on. You can also use them to surround operators
to group them such that they can be moved around as a unit. To include/exclude an operator from a group
just drag it into or out of the note boundary.
3D view
The currently viewed
procedure is submitted for synthesis and the resulting models displayed in the
3D renderer view-port.
As edits are made
to the procedure structure and constants it is regularly re-submitted so that
the models update to reflect these changes providing interactive feedback for
your design.
 |
| The output of our procedure shown in the 3D view |
 |
| Interactive editing of procedure data |
Camera
The 3D view provides
a standard range of camera controls including:
- FPS style navigation - right mouse button to look around, WASD to move forward/strafe plus QE to raise/lower.
- Modelling camera - Middle mouse button to pan, with Alt to orbit, with Control to raise/lower (Z axis), with Shift to move around the XY plane. The mouse wheel can be used to adjust the orbit distance.
- Auto-rotate - left click to toggle a carousel style orbit mode.
Grid
By default, the 3D
scene includes a ground-plane grid and an axis indicator at the origin to help visualise the 3D space and scale of
objects modelled. This can be disabled
and adjusted if needed by clicking the Grid tab at the top.
 |
| Drawing aids and their settings |
Expanded View
The normal 3D view
is fairly small but fine for a lot of modelling needs. For cases where more
detail is needed though you can toggle it to large size by pressing the Space
bar. In this view you only have the 3D
view and the property panel visible.
This is a great mode to tweak values in.
 |
| Toggling expanded 3D view |
Property Editing
Many elements in the editor can, when selected, have their properties displayed in the property panel for review and editing. This used for operator input constants, procedure properties, synthesis and rendering statistics, and grid and view-port diagnostics settings.
Types
Most data types are view-able and editable in the property panel, including; integer, floating point, boolean, colour, string, vector, and even frames have basic editing control.
Controls
Some types have specialised controls, for example, numerical values have a slider control to aid interactive adjustment. The minimum and maximum range of the slider is editable too, and stored with the procedure so it is there for convenient editing of the value next time the procedure is opened.
Integer inputs can also be set up in the operator definition to have enumerated values. This can be presented as a drop-down selection or a series of buttons. Inputs that represent a set of flags can have independant toggle buttons for each flag as well as some composite value buttons, e.g. All, for convenience.
Integer inputs can also be set up in the operator definition to have enumerated values. This can be presented as a drop-down selection or a series of buttons. Inputs that represent a set of flags can have independant toggle buttons for each flag as well as some composite value buttons, e.g. All, for convenience.
General
A few of the more general features of the editor are worth mentioning.
Undo
Most editing operations, including property changes are command based and enable full undo/redo support. The usual Ctrl+Z/Ctrl+Shift+Z keys are used to navigate the command history.
Save & Load
Procedures with unsaved changes show in bold font in the procedure browser.
Pressing Ctrl+S or the Save button at the top of the browser will save all unsaved work in one go. The save process is two stage and uses temporary intermediate files to protect your data from problems during the save process. All procedure and editing files are also kept in a back-up history. This is stored in a backup folder alongside the procedure files.
 |
| Unsaved procedures appear in bold |
All procedures are loaded at startup by default. This makes managing them much simpler.
Updates
It's worth mentioning how procedure updates are propagated and applied to the models in the 3D view. Any time you perform an editing operation on a procedure, it can potentially affect the generated output. By following the dependency graph back from the edited procedure a list of all potentially affected procedures can be built. This is then used to determine if the procedure you are viewing needs to be re-synthesised.
If you are adjusting a slider and potentially generating lots of edits in a short space of time the engine will try to update as fast as it can without swamping the synthesisers.
Summary
The functionality described here corresponds to the current state of play. This is the tool set I am currently using to build and test procedures. There is lots of scope for improvement and I have a large wish-list of features and tweaks to add. Usually these are implemented when I am building more involved demonstration procedures and find bottlenecks in the process.
No comments:
Post a Comment